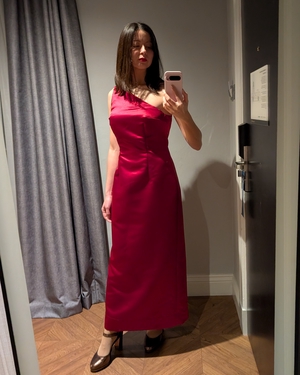
Blog: Sewing
When we were in New York last month (amazing, by the way!), I visited the famous Mood Fabrics on West 37th St. It’s such a huge shop - I was so excited! I’d actually planned to spend some time wandering around the broader garment district - but I spent so long in Mood, I never went to any other fabric shops. So that’s another thing on the to-do list for a repeat trip to NYC!
Here are my tips on how to shop at Mood Fabrics, mashed together with a diary of my own experience.
Finding the store - it’s not at street level. I walked past the shop at first because I was looking for a window display. Turns out you have to go into an office-style foyer, and take the lift to the 3rd floor. You exit the lift directly into the shop.
In September last year, I decided to sign up to the Whole 30 Fabric Challenge: a challenge that encourages you to use or give away 30 metres (or yards) of fabric that you already own, before buying any more fabric. It is a reaction against the very consumerist notion that sewing and fabric collecting are two separate hobbies - a trap that most sewists eventually fall into.
It seemed like a great idea. I don’t have a crazy amount by some people’s standards, but I do have a lot. I do have the storage space for it, and I keep good digital records of my fabrics, so I’m fully aware of what I have, but it’s still a decently sized amount of fabric that’s just sitting there. Forcing myself to use it seemed like a good thing - for sustainability, and for my wallet.
For Christmas I made my husband this super cosy pullover with the Helen’s Closet Jackson Pullover pattern, in this HILARIOUS fur-backed sweatshirting from Minerva. It’s such a fantastic print, there was no chance of me not buying it. Look at those cool bears dressed like James Dean!
This is actually my fourth time sewing the pattern, but I’ve never done the same view/size combo twice - as it’s so versatile I’ve used it for different applications each time. And that’s not even including the hoodie expansion pack that I just noticed they released (which I’m very tempted by).
For the fashion design course I’m taking, I designed, drafted, fitted and created a summer top. And I’m so proud of it! Summer might be a distant memory, but I just rediscovered my notes about the process of creating this, and I had to share.
The Design
I started with a sketch, vaguely inspired by some silhouettes I saw earlier in the summer. I iterated on a few ideas, but ultimately landed on this empire-band peplum top. I wanted something that would be a fun challenge to draft, and I was really into under-bust gathering at the time.
I keep thinking about the Pinyon Pants by Sew Liberated. I’ve been fascinated by every pair I see on Instagram. I bought the pattern – and even got the printed copy (I never do that!) but I haven’t started on them yet. I haven’t got the fabric, and I’m mid-way through another project right now. But this Pinyon Pants pattern, man. I feel so excited thinking about it.
There’s something about this moment between committing to making a pattern and actually starting work on it that feels so optimistic. This huge sense of potential. At this moment, the trousers I end up making from this pattern could be perfect, fit me like a dream, and be the best garment I’ve ever made.
Here’s another sewing pattern review for you: the Natalie skirt from Forget-Me-Not Patterns. I made it in this beautiful lightweight denim, and I’m over the moon with how it came out!
Full disclosure though: I am a part of the Forget-Me-Not patterns Insider program, which means I get free access to their patterns in exchange for social media posts about my makes. This blog post isn’t related to the programme though - I just want to talk about my new skirt y’all!
What fabric and size did I choose?
I made my Natalie skirt in the A-line view and the shorter length. I’m 5'6", for reference.
As an experiment, I set myself the target of taking a garment idea from concept to actualisation in 3 days. And I did it! Well - actually it took me 4 days. But that’s far better than not doing it at all, which is what happens to all my other ideas!
Behold, my self-drafted A-line princess seam dress:
I ended up deviating quite a bit from the original design. Below are my original sketch, and a technical drawing of what I ended up sewing. The princess seams and the flared skirt stayed, but I ditched the side panels, the racer back shoulders, and the keyhole opening. I added a centre back zipper and a boatneck.
Recently I pattern tested the Esti co-ord for Tilly and the Buttons. As I was sewing from a pre-release copy, it wouldn’t really be fair for me to review the pattern until I make a copy from the final version. But I can say that this is a solid, simple pattern, excellent for beginners! There are no closures; the top just slips over your head, and the trousers are elasticated.
I tested the cropped length view - I can’t remember for the life of me why I chose the cropped length, when crop tops aren’t really my style! But at time of writing, it’s super sunny and warm in York, so a breezy belly is comfortable. Come autumn though, I will use my leftover fabric to extend the top, so I can tuck it in for that faux jumpsuit vibe.